WRITING CODES
1. Codes for Exit CommandButtons
Private Sub Command1_Click()
End
End Sub
2. Codes for Reset CommandButtons

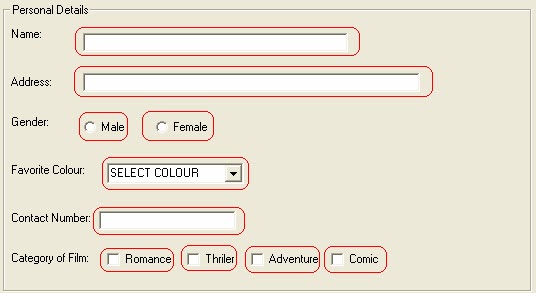
As said earlier, everything that is dragged and placed on the grey window should have a name. So, we should first know the name of the following textboxes, checkboxes and radiobuttons. To know their name, move to the properties window, and the first property is their name.
We should know the names of the following textboxes, checkboxes and radiobuttons. [The one having a red circle]
An example, to know the name of the textbox next to name follow the steps below:
- Click on the textbox
- move to the property window as shown below

Once you know their name, type the following codes:

Now let’s continue with our next textbox which is address.
Private Sub Command2_Click()
Text1 = ""
Text2 = ""
End Sub
Now for the radio buttons, male and female, type the following codes.

For the ComboBox, no need to reset it as it will be reset automatically. Do repeat the same procedure that we have done with the textbox next to name with contact number. The codes will be:

For the CheckBoxes, again their name for each check box should be know.

3. Codes for Accept Data CommandButtons
Before we start coding the Accept Data CommandButton, we need to modify the form first. Just include two textboxes, one next to the ComboBox and one next to the gender as show below:

The name of the textbox will be “Text4”. Delete the content of the textbox.
Just a small explanation on the codes we are going to type.
1. codes for presence check
Now we will ask yourself what is presence check?
Presence check will force someone to enter any text. That is, the textbox should not be left blank.
For example
To be more precise now, the field name should not be left blank as it is above when clicking on the Accept Data. The reason for this is that, we should know the name of the person we are dealing with. We cannot add data on someone without knowing its name.

That piece of codes written above need some explanation. So follow well.

To test the codes, close the white window and press F5 on your keyboard to play the form. Or you can press play above on the toolbar as shown below:

Pressing F5 or play

Now press the CommandButton “Accept Data“. The following message should be displayed:

Writing codes for address:

Again test the system as soon you have written some pieces of codes.
Codes for the RadioButon is a bit different. That is, when we click male or female, I want it to be displayed automatically next to the Textbox of gender. So how to do this. Follow the explanation below.
First of all, double click on male and type the following codes

Private Sub Option1_Click()
If Option1.Value = True Then
Text5 = "Male"
End If
End Sub
Secondly, double click on female and type the following codes
Private Sub Option2_Click()
If Option2.Value = True Then
Text5 = "Female"
End If
End Sub
The logic behind the codes is that, once a user click on male, the textbox next to gender should display Male. The same goes for female. Test your system now.
NOTE: we cannot do presence check on RadioButton. So the presence check will be applied on the textbox named “text5”.

Lets deal with the combo box “Favorite Colour”. When selecting an item on the combo box, we want it to appear inside the text box next to it. To do so, follow the steps below:
- Get the name of the combo box and the text box next to it.
- Once their names are known, double-click on the combo box to open the white window used for coding.
- change the procedure property to click. Follow the image below.

4. Once the procedure has been changed to “click”, delete the above procedure “change”.
5. Type the following codes in between the private sub and end sub.
Private Sub Combo1_Click()
Text4 = Combo1.Text
End Sub
6. After typing the codes, run the system and test the combo box by selecting a data item as shown below.
NOTE: As with the RadioButton, we cannot do presence check on ComboBox. So the presence check will be applied on the textbox named “text4”. Thus the following codes, encircled in red, will be added inside the command button “Accept Data”. Don’t forget to double click on the command button “accept data”.

From now, you should be able to write on your own the codes to test the presence check for the field contact number.
For the field “Category of Film”, we are going to modify a bit the design of the form. We have different ways of doing the presence check on check boxes. I am going to present to you one way of doing it.
First of all, modify the form to the one shown below. 
As it can be seen from the form above, there are five additional check boxes. The larger one, the user has to click on it in order to view the category of film selected. The rest four check boxes, when the user is going to click on, let say, romance, it will appear in the check box just below it. The idea will be as shown below:

The picture below shows the different categories after they have been selected.

The picture below shows what happen when one of the categories of film, previously selected, has been deselected. Once the user clicks again inside the larger text box, the category “Romance” disappears.


Character-type check
It purpose is that it checks whether or not the appropriate character has been entered into the text boxes. It applies mainly to those fields that require numbers like age, contact number, number of doors, price of an article, number of articles bought.
In our case, we need to apply character-type check in only one field and that field is “Contact Number”. So the codes are 
In practice we write the codes below the presence check done on text3.
Range check
In computer programming, bounds checking or range checking is any method of detecting whether a variable is within some bounds or limits before its use. For example, a local telephone number should contain 7 digits, not more and not less. It applies mainly to those fields that require numbers like age, contact number, number of doors, price of an article, number of articles bought.
In our case, we need to apply range check in only one field and that field is “Contact Number”. So the steps below

As it can be seen from the picture above, the field contact number as a property maxlength which is initially zero. Maxlength means the maximum number of characters that the text box can accept. If we change it to 7, as in local telephone numbers there should be 7 digits, the text box can only accept a maximum of 7 characters. But the problem is that it can also accept less than 7 characters also. Here comes the range check. So our idea is that, the contact number field should contain exactly 7 characters and they should be all numbers.
To ensure that it contain only numbers, we had perform our character-type check. So the only thing left to do is to make sure that the user will enter exactly 7 digits. So a bit of Mathematic, what is the smallest 7 digit numbers? The answer is one million (1000000). A number less than one million, we will get a 6 digit number (999999).